

Because the LCC Unity SDK uses a third-party webP decoding library, you may encounter the "Failed to open xxx.bundle" error when using the SDK on macOS. This is macOS's security mechanism (Gatekeeper) blocking uncertified third-party plugins from running, and has nothing to do with Unity or the SDK itself.
This guide has two parts:
- Part 1: Temporarily resolve third-party library permission issues in the development environment.
- Part 2: The formal solution when packaging an application (for public distribution).
Part 1: Temporarily Resolve Third-party Library Permission Issues in the Development Environment
The following methods apply to quickly removing the bundle restriction during development; try them in order of priority.
Method 1: Allow directly in System Settings (fastest)
| Step | Operation |
|---|---|
| 1 | Open the Mac System Settings, and find Privacy & Security on the left |
| 2 | Scroll down to find the "Security" section |
| 3 | Find the prompt "xxx.bundle was blocked from use", and click the adjacent Allow button |
| 4 | Restart Unity, then re-import or run the SDK |
Method 2: Remove the quarantine attribute via Terminal (most thorough)
macOS adds the com.apple.quarantine quarantine attribute to files downloaded from the network; you can remove it directly with a Terminal command.
| Step | Operation |
|---|---|
| 1 | Open Launchpad → Other → Terminal |
| 2 | Enter the command (keep a trailing space): sudo xattr -rd com.apple.quarantine |
| 3 | Drag the xxx.bundle file that reported the error directly into the Terminal window to auto-complete the path |
| 4 | Press Enter, and enter the Mac login password (not shown while typing, which is normal) |
| 5 | Restart Unity after the command completes |
Tip:
This command requires administrator privileges (
sudo). The screen will not show anything while you type the password; just finish typing and press Enter.
Method 3: Add executable permissions (supplementary)
If Methods 1 and 2 still do not work, add executable permissions to the bundle:
chmod -R 755 /path/to/xxx.bundleYou can also drag the bundle file into the Terminal to auto-complete the path, press Enter, and restart Unity.
Method 4: Check Unity plugin platform settings
| Step | Operation |
|---|---|
| 1 | Find the xxx.bundle file in Unity's Project window |
| 2 | Select it and look at the Inspector window |
| 3 | In Platform Settings, check Any Platform, or separately check Standalone / macOS |
| 4 | Make sure Exclude Platform is not checked |
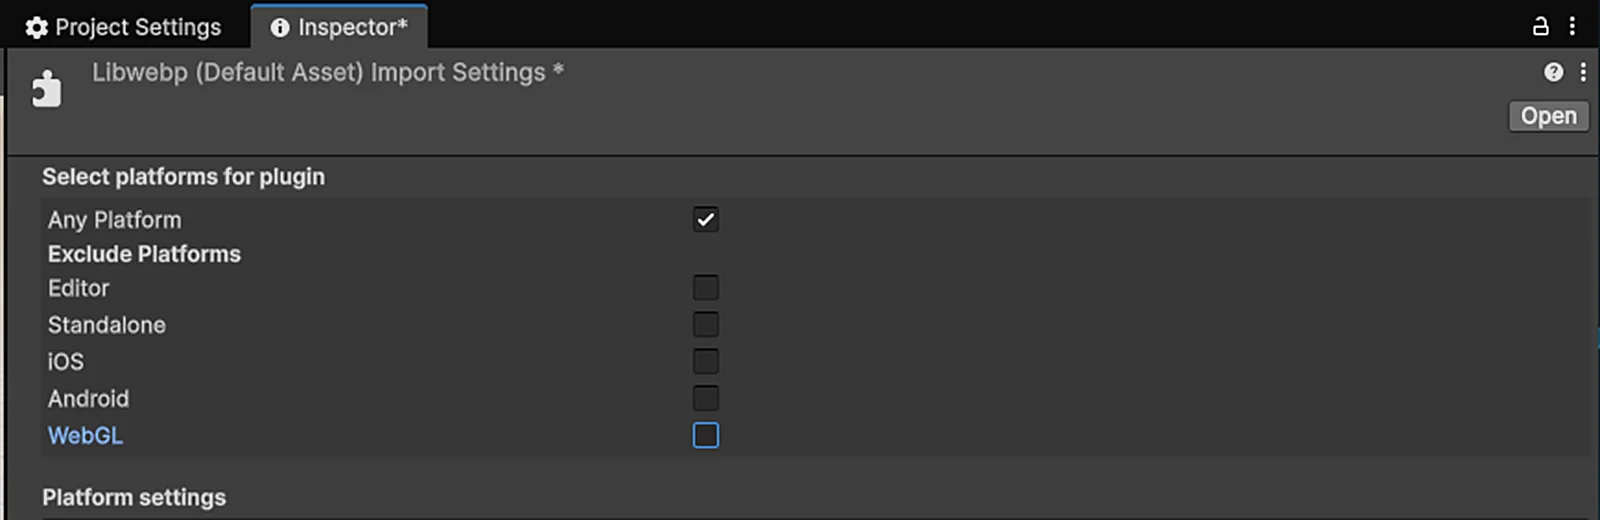
Check Any Platform or macOS in Platform Settings in the Inspector
Method 5: Temporarily disable Gatekeeper (last resort)
Warning:
This method reduces system security. It is only recommended for temporary use on a development machine; be sure to re-enable it after development is complete.
If none of the above methods work, you can temporarily disable system security verification:
sudo spctl --master-disableVerify whether it is disabled:
spctl --status
# assessments disabled is shown when disabled successfully
Re-enable security protection after development is complete:
sudo spctl --master-enablePart 2: Resolve Third-party Library Permission Issues When Packaging an Application
To let end users use an application containing a third-party SDK with no perception of the issue, you must complete "deep code signing + Apple notarization + Staple ticket binding" on the developer side. This is the only compliant standard solution on macOS with zero user operations.
Prerequisites (all required)
| No. | Condition | Description |
|---|---|---|
| 1 | Apple Developer Program | USD 99/year, used to obtain the Developer ID Application certificate |
| 2 | Enable Hardened Runtime | In Unity Player Settings → Other Settings → Mac, check Use Hardened Runtime |
| 3 | Configure a unique Bundle ID | Keep it consistent with the developer portal |
| 4 | Disable Unity auto signing | Use Terminal to manually deep-sign after packaging |
Complete Signing and Notarization Workflow
Step 1: Clear extended attributes
xattr -cr "YourApp.app"Step 2: Deep recursive signing
The --deep parameter automatically traverses all internal .bundle, .dylib, and .framework files and signs them uniformly, thoroughly solving the problem of third-party bundles being blocked for being unsigned.
codesign --force --deep --options runtime --sign "Developer ID Application: YourCompany (TeamID)" "YourApp.app"Key point:
Replace
YourCompany (TeamID)with your full Developer ID. Using--deepensures all internal third-party bundles are signed — this is the root cause of 90% of the "still errors after signing" issues.
Step 3: Package a standard zip for notarization
You must use the ditto command to package; do not use the system right-click compression (otherwise the notarization verification will fail).
ditto -c -k --sequesterRsrc --keepParent "YourApp.app" build.zipStep 4: Upload to Apple for notarization
Use notarytool (the official new tool) to submit for notarization; Apple's backend automatically scans for malicious code:
xcrun notarytool submit build.zip --apple-id your@apple.com --password app-specific-password --team-id TeamID --waitWait for Accepted to be returned, which means notarization passed.
Step 5: Staple the notarization ticket into the App
After stapling, users can pass verification even when opening offline:
xcrun stapler staple "YourApp.app"
# Verify whether it succeeded
xcrun stapler validate "YourApp.app"
Internal Testing / Enterprise Intranet Distribution (alternative)
If you do not yet have an Apple developer account, you can distribute within the intranet using the following approach:
| Step | Operation |
|---|---|
| 1 | Unity packages the .app |
| 2 | On the build machine, run: xattr -rd com.apple.quarantine "YourApp.app" |
| 3 | Distribute through intranet tools (scp, enterprise cloud drive, USB drive), do not download via a browser |
Limitation:
This approach only applies to intranet transfer. Browser downloads will re-add the quarantine attribute, causing the bundle error to reappear, and is not suitable for public distribution.
Common Pitfalls
| Common mistake | Correct approach |
|---|---|
Signed only the main program, without --deep | Must use --deep to recursively sign all internal bundles / dylibs |
| Did not enable Hardened Runtime | Check it in Player Settings before Unity packaging, otherwise notarization fails directly |
| Forgot to staple the ticket after notarization | Must run xcrun stapler staple, otherwise offline opening still shows the dialog |
| Did not clear extended attributes before signing | Run xattr -cr first to clear residual attributes of all bundles, then sign |
Used system right-click compression instead of ditto | Must use ditto -c -k standard packaging, otherwise notarization verification fails |
Summary
The only standard solution for public distribution = Apple Developer ID + deep codesign + notarytool notarization + stapler ticket. After completion, users download and use it immediately, with no security dialog and no perception of the issue.
This chapter is from the official XGRIDS user manual. Official source (opens in a new tab) · Updated:



