

Pico 4 Ultra's Business Streaming renders the Unity project on the PC and streams it to the device for browsing and interaction via PICO's official Business Streaming tool, thereby leveraging the computing power of the PC to achieve higher performance than on-device rendering. This guide explains how to integrate the LCC Unity SDK and complete streaming development with Business Streaming.
Version Requirements
The software and plugin versions used in this guide are as follows. It is recommended to develop with the same versions; other untested versions may have compatibility issues:
| Software / Plugin | Version | Description |
|---|---|---|
| Unity | v6000.0.69f1 and above | Using Unity 6 |
| OpenXR | 1.61.1 and above | Unity OpenXR Plugin, installed from Unity Registry |
| LCC Unity SDK | v2.3.0 and above | Obtain from the LCC Unity SDK download page |
| Business Streaming | v2.2.0 and above | Obtain from PICO official |
Note:
- Business Streaming connects via OpenXR, which is different from the Pico 4 Ultra Development Guide that uses the PICO Unity Integration SDK; do not mix them up.
- The Unity version, the OpenXR version, and the LCC SDK version all affect rendering and performance, so try to keep each software version consistent with this guide.
Development Workflow
Step 1: Prerequisites
Download and install Business Streaming v2.2.0 or above on both the computer to be streamed from and the Pico 4 Ultra device; it is recommended to restart the computer once after installation.
Step 2: Create a URP project
Select the Universal 3D (URP render pipeline) type in the project template, as shown below:
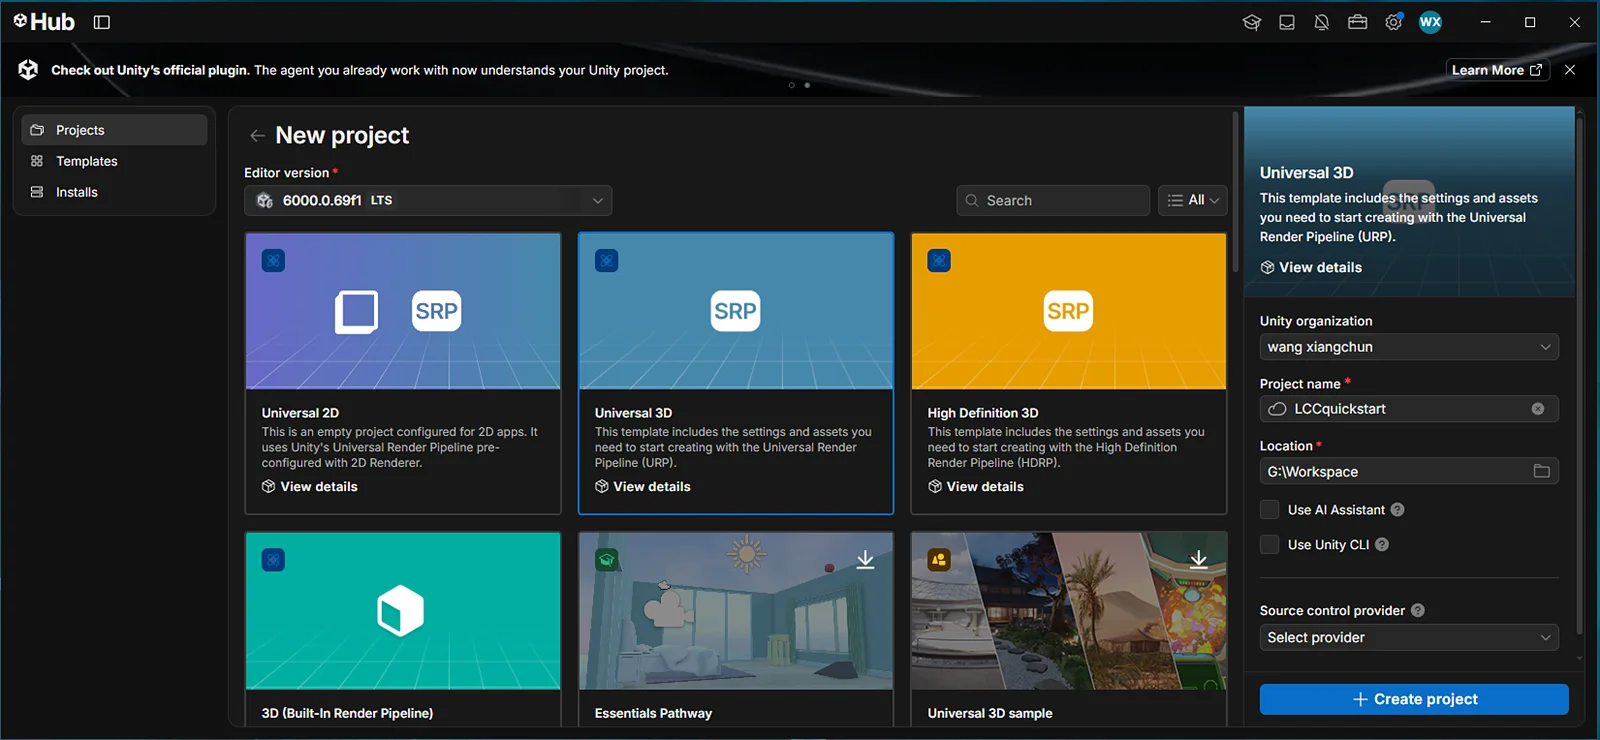
Create a Universal 3D project
Step 3: Import Unity OpenXR
Open the UPM window via the Unity menu Window → Package Manager, select Unity Registry in the left list, enter OpenXR in the search box, select OpenXR Plugin from the search results and install it, as shown below:
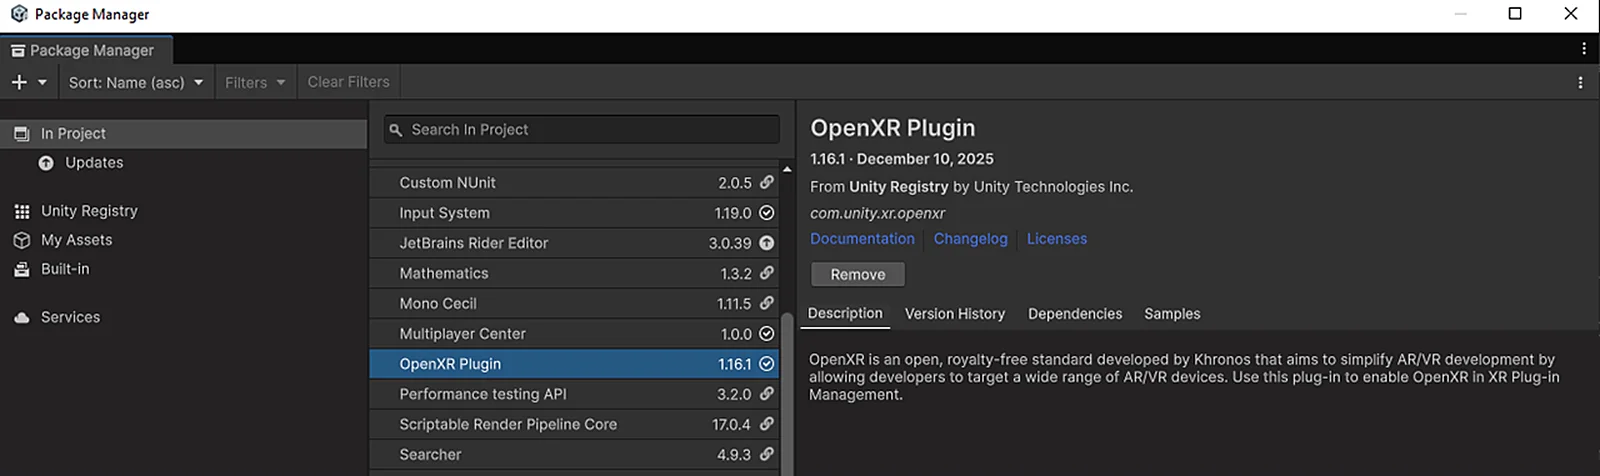
Install the OpenXR Plugin from Unity Registry
Step 4: Import the LCC Unity SDK
Open the UPM window via the Unity menu Window → Package Manager, click + on the left, select Install package from disk from the drop-down menu, locate the LCC Unity SDK, and select the package.json file to import it, as shown below:
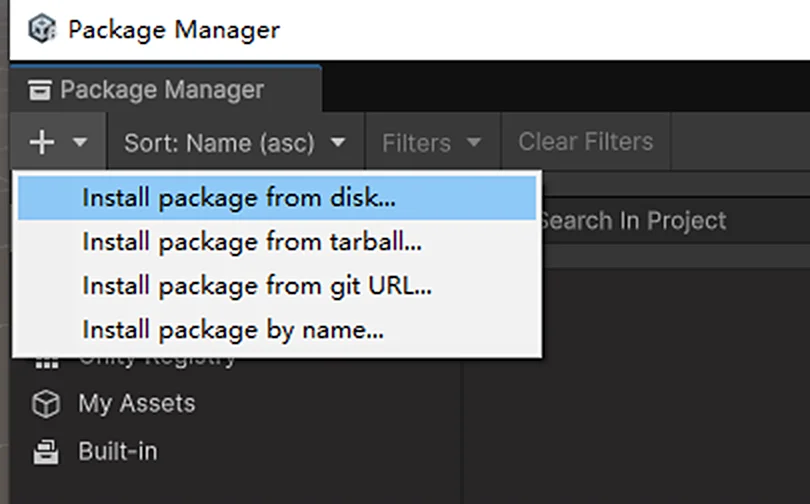
Import the LCC Unity SDK via Install package from disk
Note: After completing the steps above, restart Unity before proceeding with the subsequent settings.
Step 5: Set up the Unity environment
Configure XR Plug-in Management
Select File → Project Settings from the Unity menu bar, select XR Plug-in Management on the left, check Initialize XR on Startup under the PC, Mac & Linux Standalone Settings tab, and check OpenXR as the Plug-in Provider, as shown below:
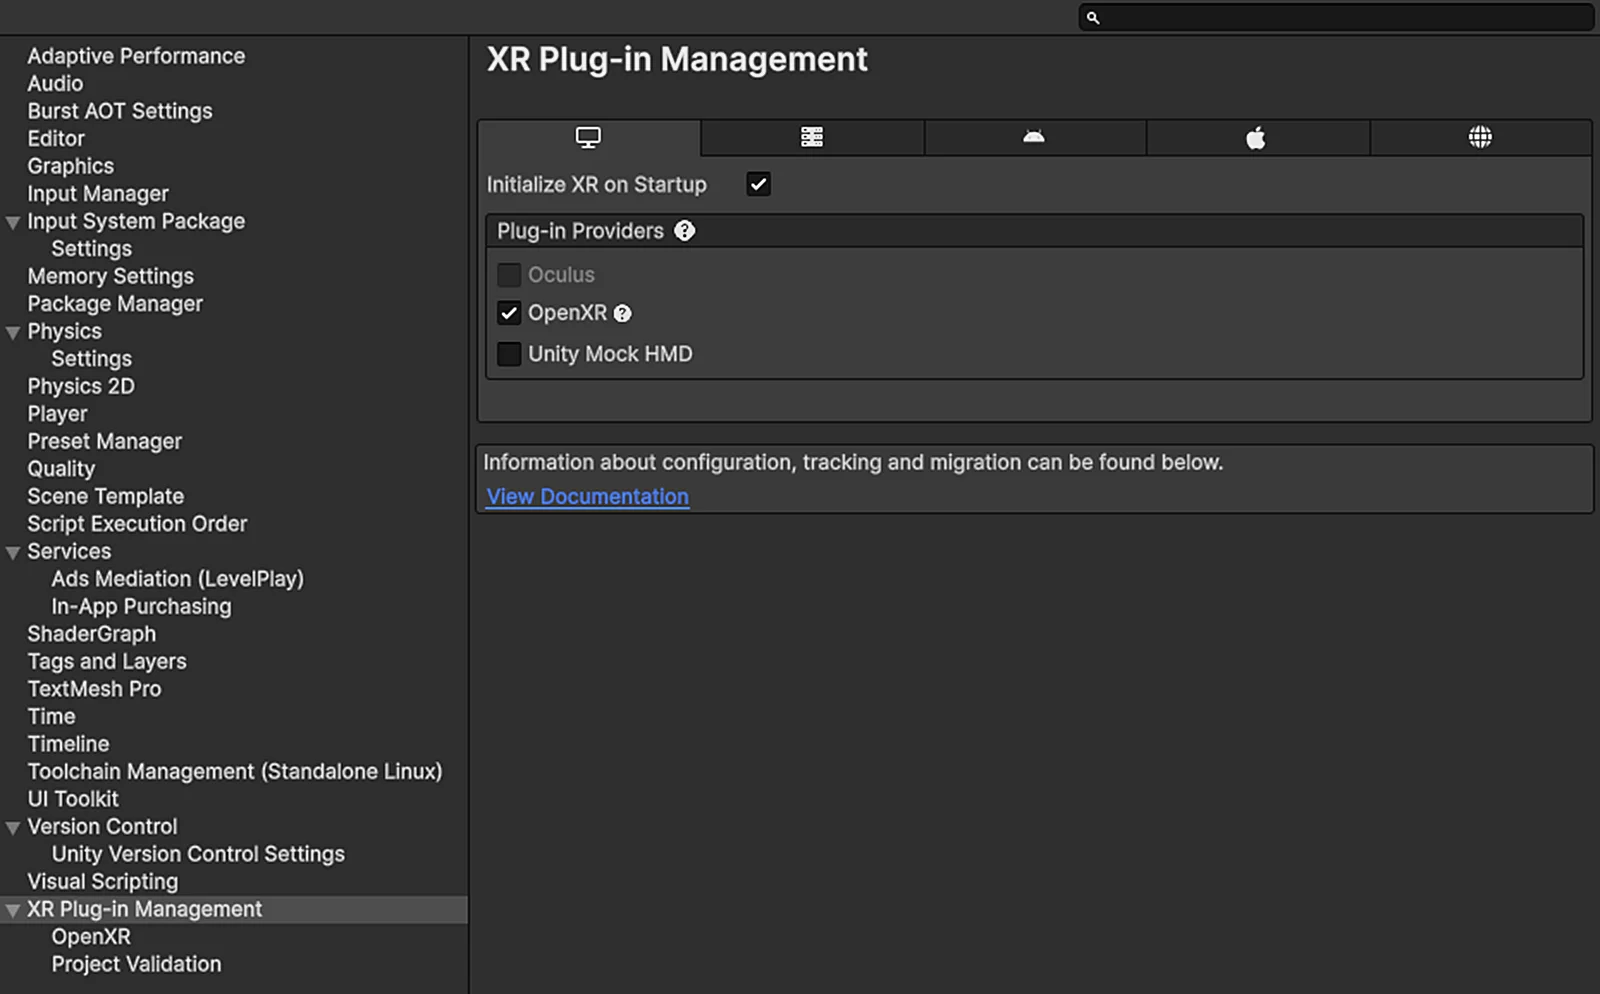
Check Initialize XR on Startup and OpenXR in XR Plug-in Management
Note: If a yellow warning icon appears after OpenXR, click Fix All to fix everything.
Select the OpenXR item under XR Plug-in Management, and set Render Mode to Single Pass Instanced or Multi Pass as needed; generally Single Pass Instanced provides better performance, and the remaining settings stay at their defaults, as shown below:
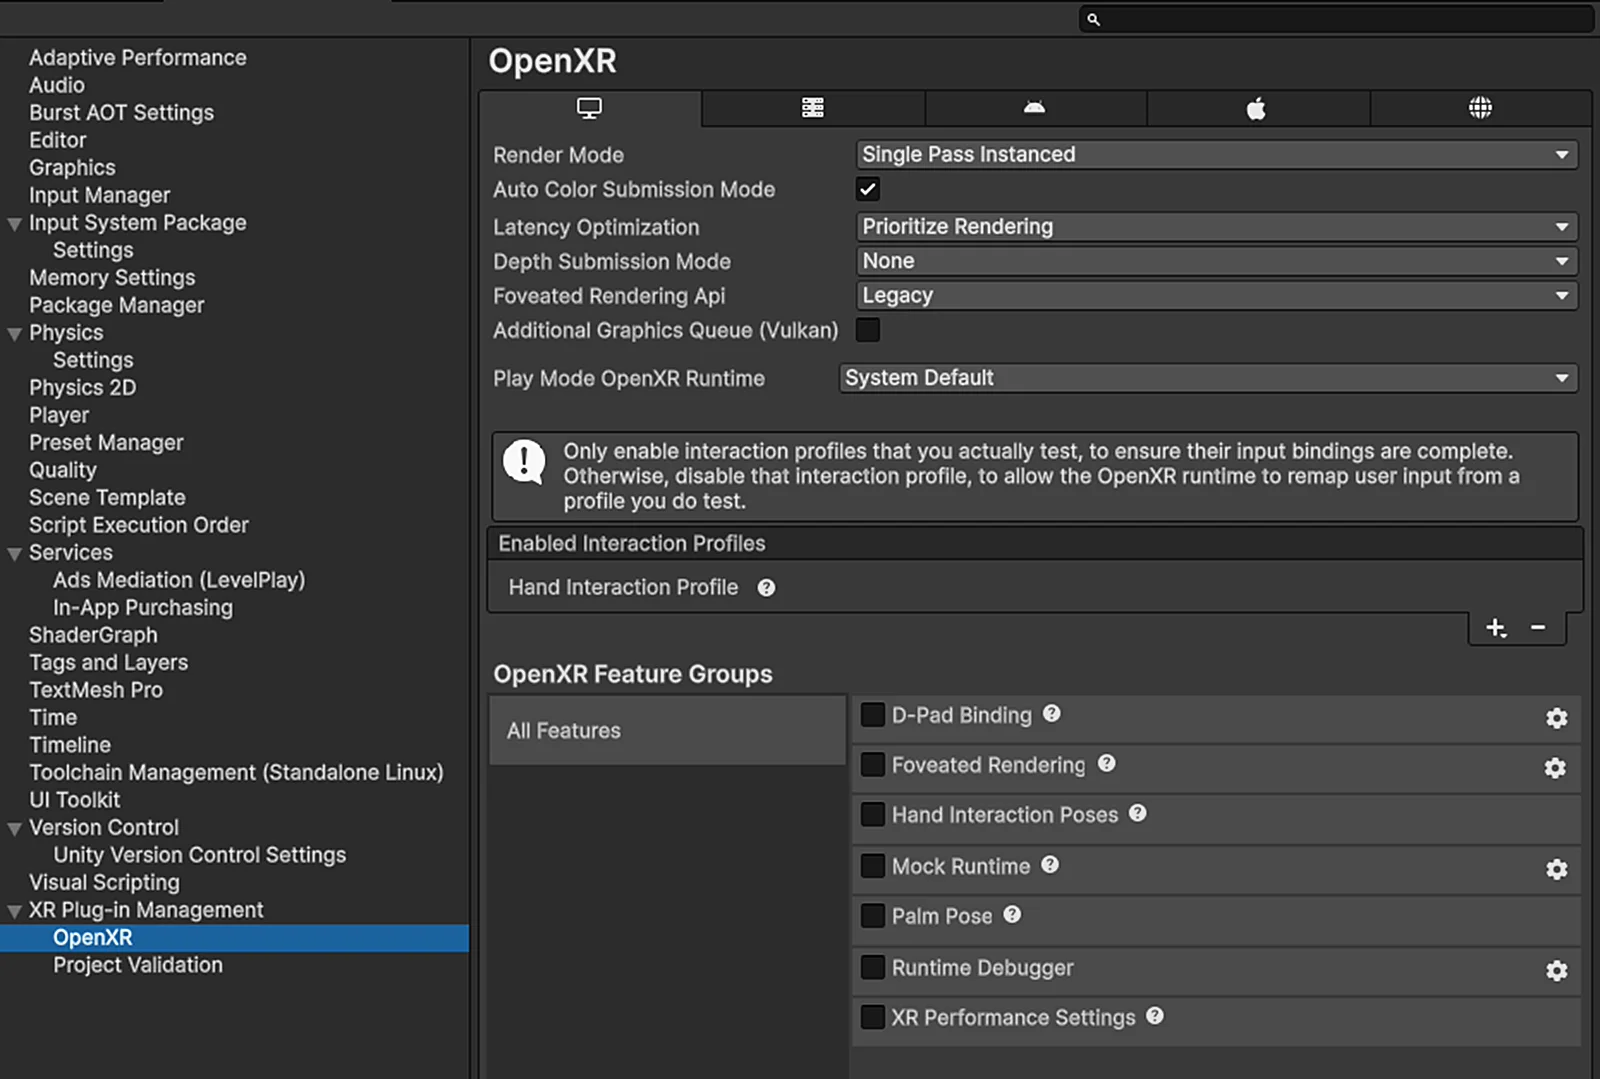
Set the OpenXR Render Mode to Single Pass Instanced or Multi Pass
Configure graphics APIs
Open the settings panel via Edit → Project Settings → Player, select the Other item under the corresponding platform tab, and configure the graphics APIs per platform:
| Platform | Action |
|---|---|
| Windows | Uncheck Auto Graphics API for Windows, and add DirectX12, Vulkan, and DirectX11 as the three graphics APIs |
| macOS | Uncheck Auto Graphics API for Mac, and keep the Metal graphics API |
| Linux | Uncheck Auto Graphics API for Linux, and keep the Vulkan graphics API |
Note: On the Windows platform, it is recommended to use DirectX12 or Vulkan, which provide better performance; for DirectX11, it is recommended to enable HDR rendering to avoid rendering artifacts.
Step 6: Create the scene
This example starts from a brand-new Scene. Create a Unity scene (Scene), right-click in an empty area of the hierarchy window (Hierarchy), and select XR → Convert Main Camera To XR Rig from the popup menu to convert Main Camera into an XR camera.
Step 7: Configure the scene
Select the XR Rig GameObject in the hierarchy window (Hierarchy), and in the property window (Inspector), set the Request Tracking Mode of the Camera Offset property to Floor, as shown below:
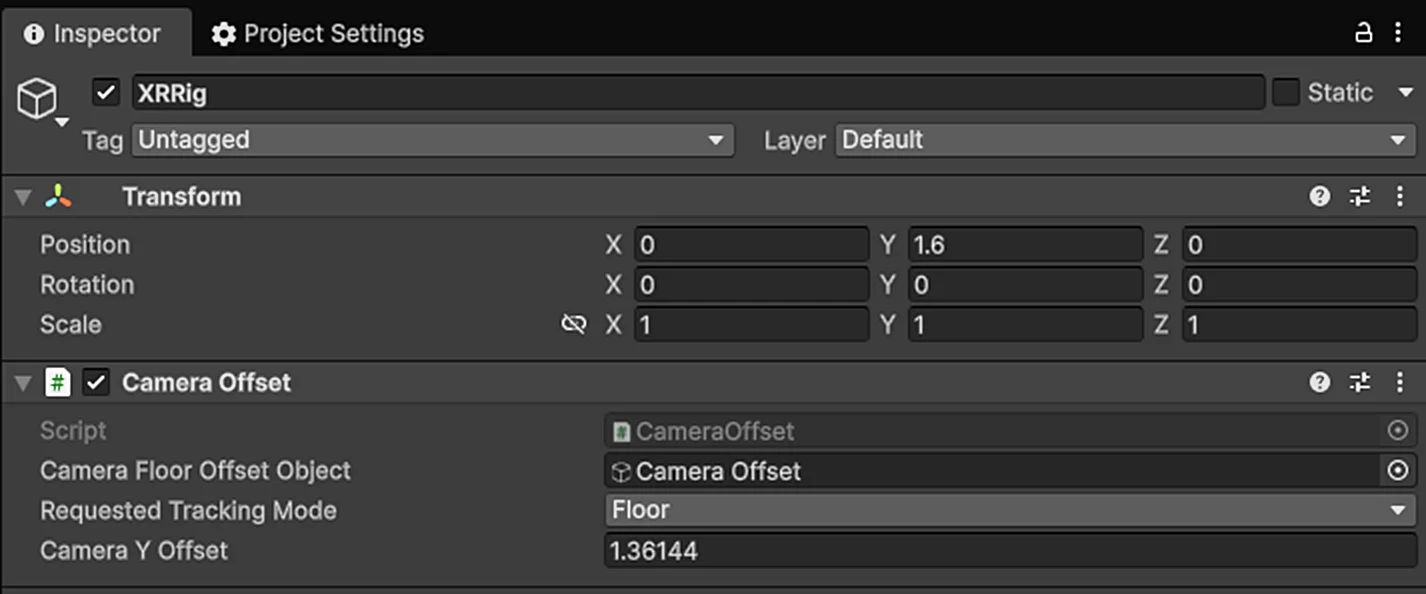
Set the XR Rig Camera Offset Request Tracking Mode to Floor
Select the XR Rig → Camera Offset → Main Camera GameObject in the hierarchy window (Hierarchy), and set the Camera component properties in the property window (Inspector): Clipping Planes Near = 0.3, Far = 5000; Anti-aliasing = No Anti-aliasing; Opaque Texture = Off, Depth Texture = Off; Background Type = Solid Color, Background = black; HDR Rendering = Off, MSAA = Off, URP Dynamic Resolution = Off, as shown below:
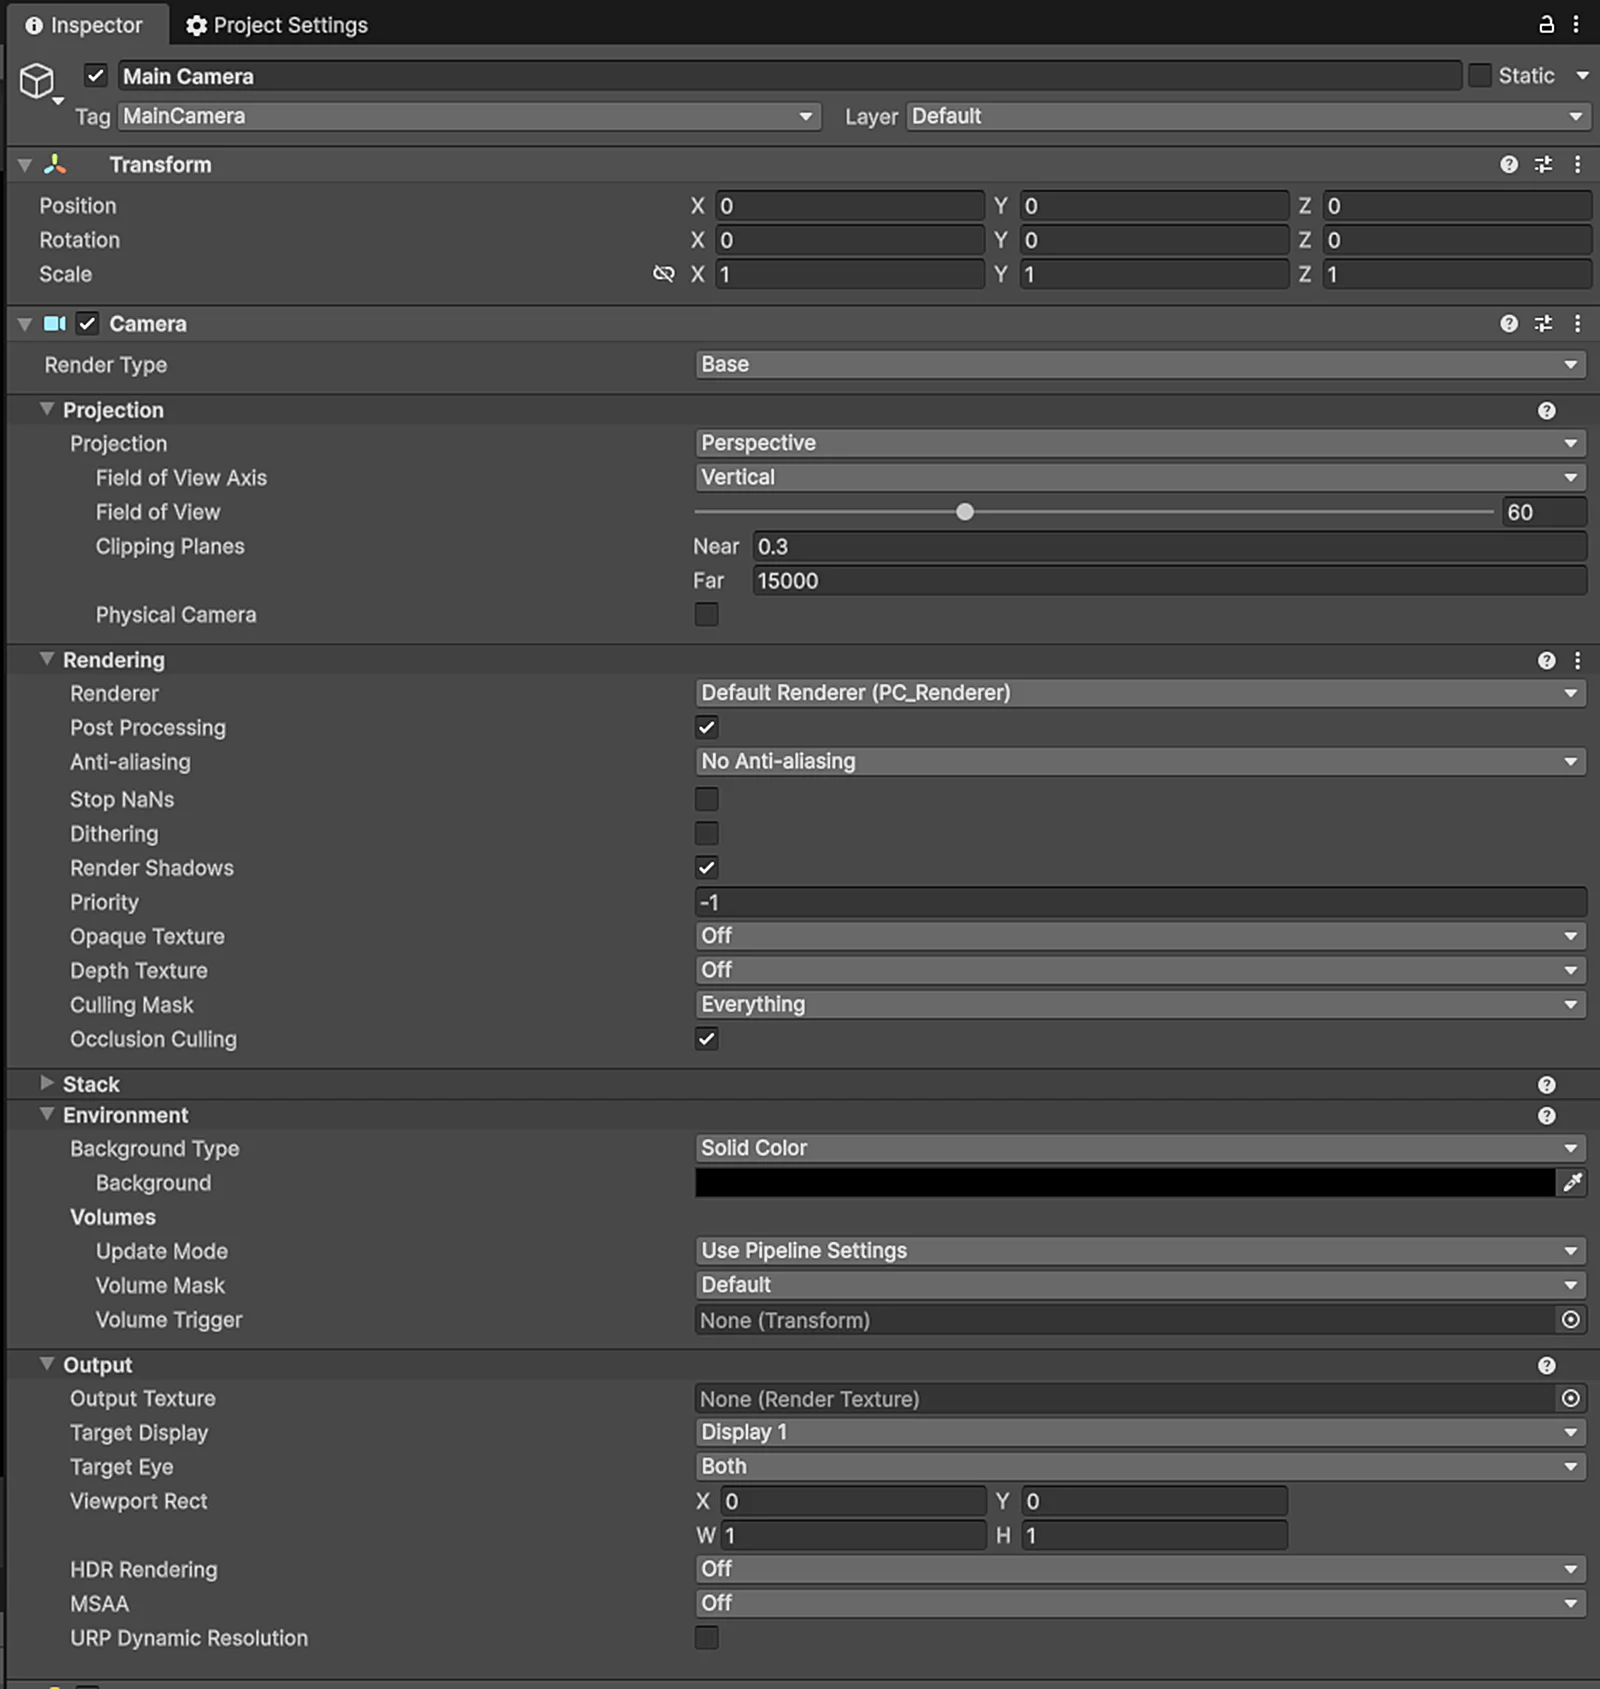
Set the Camera component properties of Main Camera under XR Rig
Step 8: Write code to load the scene
Right-click Create Empty in the hierarchy window (Hierarchy) to create an empty object, name it LCCManager, normalize its Transform, and attach the LCCManager script via Add Component, as shown below:
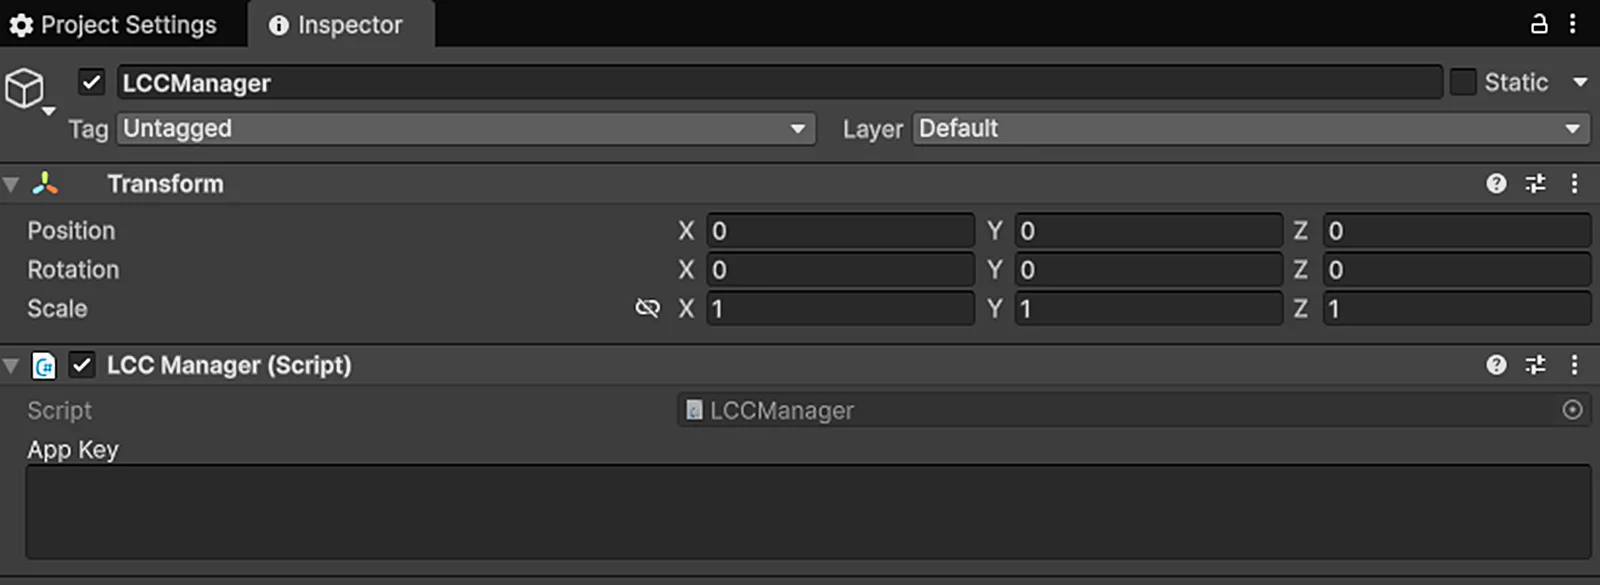
Create an LCCManager empty object and attach the LCCManager script
Right-click Create Empty in the hierarchy window (Hierarchy) to create another empty object, name it LCCRenderer, and set its Transform Rotation.x = -90, Scale.x = -1, as shown below:
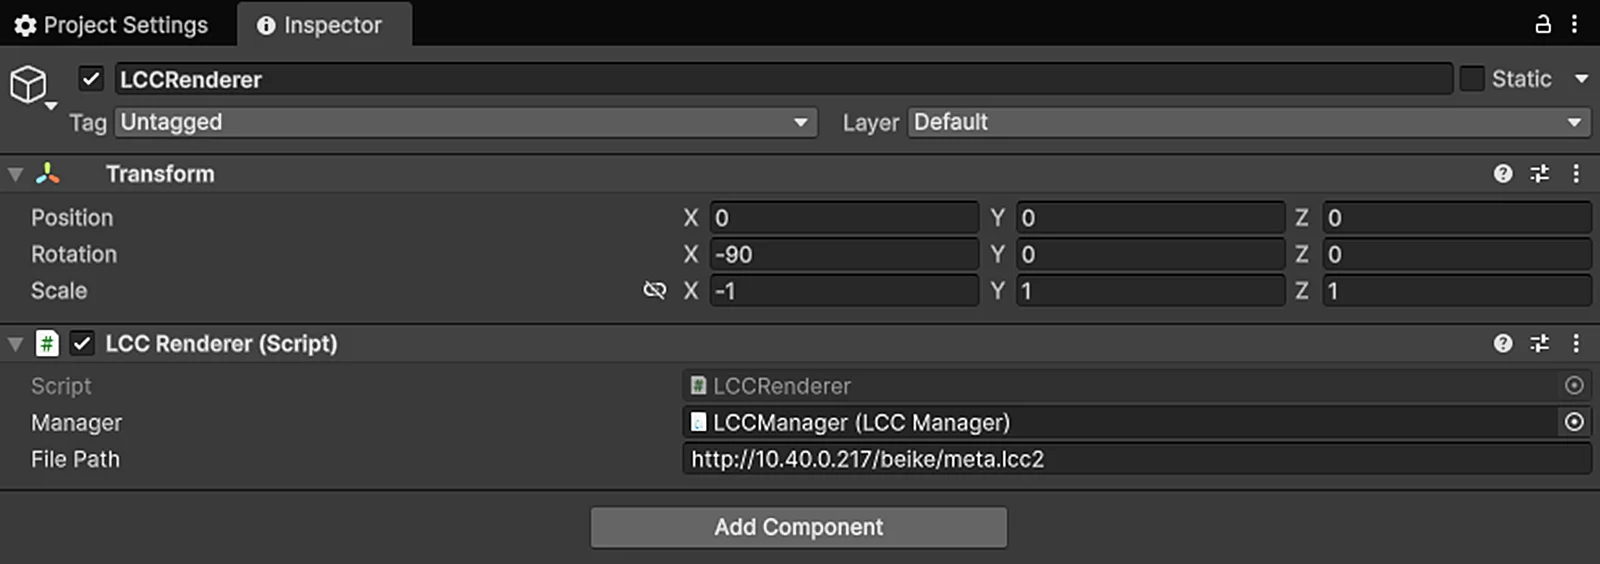
Create an LCCRenderer empty object, and set Rotation.x = -90 and Scale.x = -1 to align the coordinate systems
Rotation.x = -90 and Scale.x = -1 are the alignment transformation from the LCC data coordinate system (Z-up, right-handed) to the Unity coordinate system (Y-up, left-handed); see "LCC data coordinate system" in Unity SDK Introduction.
Write a C# script named LCCRenderer.cs with the following code:
using LCCCore;
using UnityEngine;

[DefaultExecutionOrder(100)]
public class LCCRenderer : MonoBehaviour
{
    public LCCManager m_manager;
    public string m_FilePath;
    private LCCCore.Renderer m_renderer;
    private Camera m_mainCamera;
    private bool m_isLoaded = false;

    void Start()
    {
        m_mainCamera = Camera.main;
        // set platform type to PCVR
        m_manager.SetPlatformType(PlatformType.PCVR);
        m_manager.SetMainCamera(m_mainCamera);
        m_manager.SetLockFPS(false);
        //Set the full render splat to 15 million, which means LCC LOD0 > 15 million will go chunk rendering path.
        //m_manager.SetFullRenderSplat(1500);
        //Set the max render splat to 15 million, which means max on-screen splat limit to 15 million on chunk rendering path.
        //m_manager.SetMaxRenderSplats(1500);
        m_renderer = m_manager.GetRender(this.transform);
        if (m_renderer == null)
            Debug.LogError("GetRender failed, check if the manager is set correctly and the file path is valid.");
        m_renderer.Load(m_FilePath, onLoadProgress, onLoadCallback, onError);
    }

    private void onLoadProgress(float value)
    {
        Debug.Log($"loading progress: {value}");
    }

    private void onLoadCallback()
    {
        //set the start lod to 2, which means the initial rendering will be at LOD2 level.
        //m_manager.SetStartLod(2);
        Debug.Log("data loaded !!!");
        m_isLoaded = true;
    }

    private void onError(string error)
    {
        Debug.LogError($"load error: {error}");
    }
}
Attach the script to the LCCRenderer GameObject in the hierarchy window (Hierarchy), then drag the LCCManager GameObject to the script's Manager property in the property window (Inspector), and finally fill in the LCC file path.
After completing the above configuration, the scene structure in the hierarchy window (Hierarchy) is as shown below:
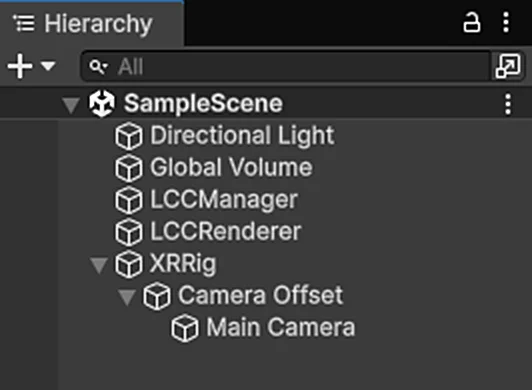
The scene structure after configuration
Note: The scene must keep the Directional Light, Global Volume and other objects created by default in the URP project.
Step 9: Set up Business Streaming
Launch Business Streaming on the computer, select Settings → General, and set Default Streaming Type to OpenXR Streaming, as shown below:
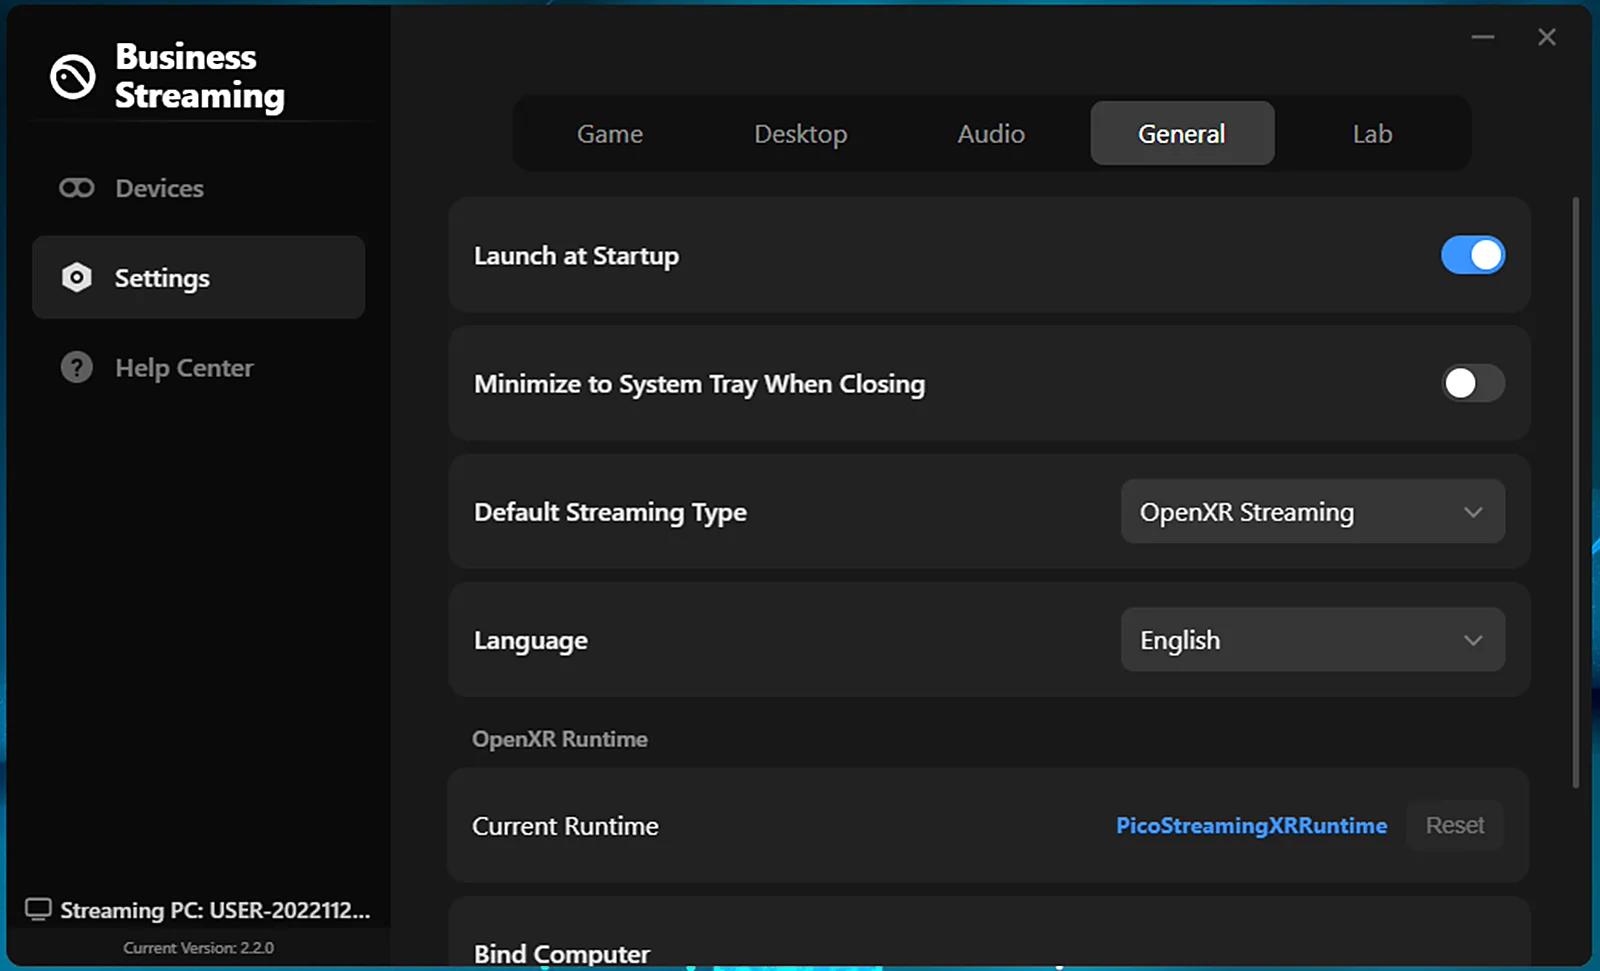
Set the Business Streaming Default Streaming Type to OpenXR Streaming
Step 10: Start streaming
- Connect the Pico 4 Ultra to the computer via USB 3.0 or high-speed Wi-Fi.
- Open Business Streaming on the Pico 4 Ultra device and connect to the computer.
- Click the Play button in the Unity Editor to run, or open the published application, to start streaming.
Note:
- For using the Business Streaming software, refer to the PICO official documentation: https://business.picoxr.com/cn/doc/Business-Streamingv2.
- For project settings, refer to the Project Settings Optimization Guide.
- Streaming requires high-end PC hardware (especially the graphics card); use a high-performance computer for streaming and use USB 3.0 or high-speed Wi-Fi.
- PCVR streaming renders twice (SPI mode also has doubled vertex overhead), so performance and frame rate can be improved by configuring full/chunked rendering, the maximum on-screen render count, the starting LOD level, etc.; for parameter settings, refer to the Render Performance Parameters Guide.
Related Reference
- For project settings and performance optimization, see the Project Settings Optimization Guide and Render Performance Parameters Guide chapters.
- For the on-device rendering workflow using the PICO Unity Integration SDK, see the Pico 4 Ultra Development Guide.
- For other Business Streaming usage instructions, refer to the PICO official documentation: Business Streaming.
This chapter is from the official XGRIDS user manual. Official source (opens in a new tab) · Updated:



